Sunday, March 29, 2015

Hop to it: How to make a Spring Easter Bunny Wreath

Last Spring when I was off work for shoulder surgery I got tons and tons of crafty projects done (and some, of course, only half done). I told my friend Mel about some adorable bunny wreaths that I had seen on Pinterest that I wanted to make. As soon as she saw all of them, she wanted to make one too. Here's one of the cute wreaths I showed her at Bubbly Nature Creations.

So we went out to Walmart to buy all the supplies we needed. Walmart actually has a pretty nice craft section and I managed to find everything I needed to make this wreath there. Here's the supplies we used:

  • 2 wreaths (1 small for the head and 1 larger for the body)
  • floral wire
  • glue gun
  • plastic eggs
  • ribbon (I used a few different kinds)
  • Spanish moss
  • flower clip for the side of the bunny's ear
I made a wreath for my front door and as soon as my Mother in law saw it she oohed and aahed her love over it so much that I made her one of her own. Since I made these wreaths before I started this blog I decided to make another one so I could give everyone a tutorial on how I made these adorable bunny wreaths.

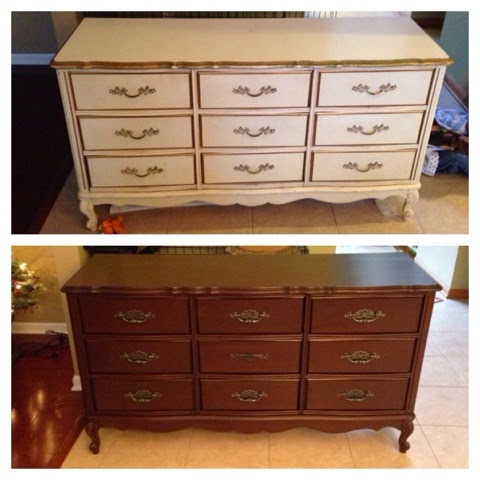
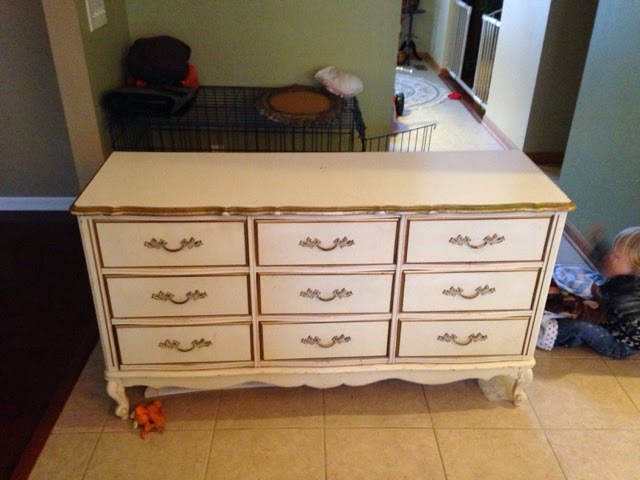
Here's a pic of my wreath:


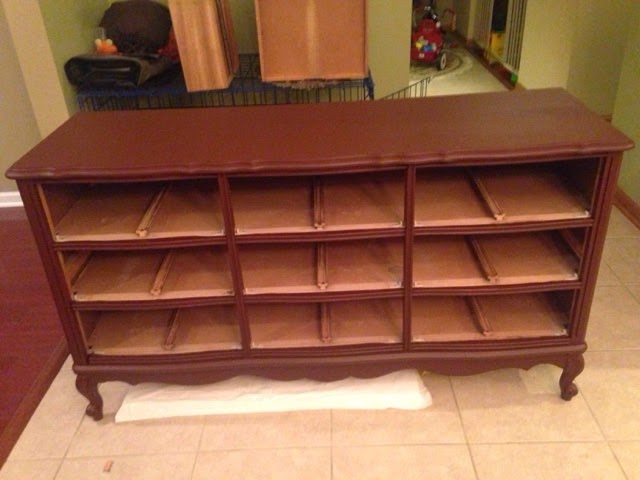
And here's a picture of my Mother in law's:
Both wreaths have weathered out last spring and this spring very well. They are both on covered porches but it's very windy and rainy and the weather can change from 30's and snow to 70's and sunny during the course of a couple days during spring in the Midwest, so I'm pretty impressed by my homemade wreaths.


My tutorial is on a mini version of the two I made last year. A baby bunny wreath to hang in my house for a cute Easter decoration inside my display frame.

I gathered up two small wreaths. I had one in my stash and purchased the smaller wreath for $2 at Walmart along with some sparkley eggs for $1.49. I went ahead and brought out all my supplies so they'd be right in front of me. I already had all the ribbon, Spanish moss and floral wire leftover from last years bunny wreaths.
First I wound the two wreaths (head and body) together with floral wire.
You just loop the wire through parts of the grapevine on each wreath and twist to make a knot when done. Use as much as you want to make sure the two wreaths are secure. I used three strands on this wreath. It doesn't have to look pretty since no one will see it.

Next, flip the wreath so it is facing up and hot glue your eggs on.
I tried to lay the eggs out in a pattern that I liked and then proceeded with gluing them on. They don't always stay in place(they like to roll right off) but just to get a general idea I like to lay them out. If you don't like how one looks, it easily pulls off and can be re-glued and repositioned.
After the eggs were all glued on I put the ears on. I used floral wire bent in half. Since I was making a baby bunny I cut the ears a little shorter with wire cutters.
To put the ears on I simply shoved the wires into the grapevine wreath where they looked good and squeezed a generous amount of hot glue onto the wire and wreath to hold them in place. Since I used wire I can reposition and bend the ears as much as I want to get the desired ear look I want.
Here's a view of how the hot glue holds the ears in place. At this point I hung the wreath up on a doorknob to make it easier to do the final steps and to see exactly how everything will look upon completion.
After the ears are on I clipped the flower clip onto the wreath right next to one of the ears and started hot gluing Spanish moss all over the wreath. I find this helps to soften the wreath and make it look more like a furry rabbit. It also helps to blend the wreath with the ears since I cover the wire ears with hot glued Spanish moss and leaves and twigs that have fallen off the wreath during the whole process (lots and lots of "stuff" falls off the wreath while you make it, so have your broom handy!).
To do the ears I simply wrapped them with Spanish moss and hot glued it to the wire. I also glued sticks and leaves from the actual wreath (if you don't have enough you can break some twigs off the wreath in an inconspicuous area) to make the ears look like they belonged on the wreath.
 After all the Spanish moss gluing I tied a pretty ribbon around the rabbit's neck. I used three different sparkly ribbons (oh, how I love sparkles). I also found some tiny sparkly eggs at Salvo so I glued one of those in the middle of the flower clip to make it pop.

Here's the huge mess I had to clean up after making this wreath. Jackson somehow inherited all the leftover eggs (he brought them all to me to "help"). This is definitely one of the messiest wreaths I've made, but it's still not even half as messy as the first one I made. Mel and I decided we would make our own sparkly eggs so we hand painted all our eggs and then sprinkled glitter on them...Not one of our best ideas and needless to say I was finding and cleaning up glitter for weeks after that.
This bunny wreath is however very cheap to make. Each one cost me less than $10. The last one being the cheapest since I already had most of the supplies. The bag of Spanish moss lasted through all three wreaths as did my roll of polka dot green ribbon.

Here's another pic of the finished baby bunny wreath:
You all better hop to it and make this easy, adorable Easter Bunny wreath since Easter is only a week away!! Wow, where did the time go?


-Sherri


Thursday, March 26, 2015

Easy and Fun Easter Eggs for Little Ones: Toddler Friendly Egg Dying with PAAS Color Snaps

Easter is coming up so fast this year I feel like I don't have enough time to fit in all the fun Easter activities with our busy lifestyle! But that's not going to stop me from trying so my little one can have a fun-filled holiday.

My mom came up unexpectedly from Arizona on a sad visit to go to her Aunt's funeral. Of course it snowed several inches while she was here when a week before we were pushing 70 degrees and everyone was so giddy from spring fever that they put their shovels in storage (gotta love spring in Illinois). She was able to visit with Jackson and I on her last day for a few hours when I got off work so I decided it was the perfect opportunity to do something fun with Grandma!

Enter PAAS color snaps. A woman at work raved to me about color snaps with her two toddlers in tow. She went on and on about how great they were. Since I had been wondering if Jackson would sit through dying eggs because he has typical toddler ADD and dying eggs is not the most exciting fast paced activity that he craves, I decided to try out these so-called color snaps.

While the snow was coming down outside like it was Christmas Eve, I boiled some eggs, let them cool and we got started.
The color snaps come in five colors: pink, yellow, green, blue and purple. To use these q-tip color filled contraptions you just snap the top area where the line is. Then all the color flows down to one end of the q-tip that you use to "color" your eggs. I'll admit I snapped the purple one and got sprayed in the face a little bit (luckily it washed right off). This is not the cleanest activity but neither is dying eggs the traditional way.
My co-worker, Cindy, came up with a brilliant idea to use trays that liquid water enhancers are displayed in to hold dyed eggs until they've dried. She gathered up a bunch for me and they really worked great!! I'm going to use them every year now!

Jackson immediately loved using the color snaps. He held onto the egg and colored all around his hand.
We Skyped with Jackson's cousin Jade in Arizona the whole time he colored eggs. He had to show her each egg when he was finished coloring it.

Jackson was really focused on coloring his eggs.


Jackson thoroughly enjoyed coloring the eggs with the color snaps. He never got bored and he colored all one dozen eggs.  I even managed to get Jackson to smile in one of the pictures, which he does maybe once in a hundred pictures even though I beg and plead and ask him to say money til I'm blue in the face (maybe I should take a leaf out of one of those photographer's books who fake sneeze and talk in baby voices)!
Here's all 12 colored eggs. My mom and I  had to try the color snaps out for ourselves so we put a few personal touches of our own on a couple eggs (they're not Van Gogh-esque by any means, well maybe Jackson's are) The color snaps had plenty of "color" in them for all 12 eggs but they did start to dry up after 15 minutes or so of non-use.
Overall I really liked PAAS color snaps. Jackson seemed to have a lot of fun and so did my mom and I. However it was a little messy. Especially when I peeled the eggs for Jackson to eat (he loooves hard boiled eggs). All the color came off on my hands and it took some scrubbing to come off.

We will definitely use them again (probably as soon as this weekend when we dye eggs with Cory's family). I wish I would have known about them last year since Jackson had absolutely no interest whatsoever in what everyone was doing at the table. I'm so glad I found out about them in time for dying eggs this year though!

Disclaimer: I am in no way affiliated with PAAS. All opinions, experiences and dyed eggs are my own (and Jackson's).

-Sherri

Monday, March 23, 2015

Painted Thrift Store Dresser: From Shabby French Provincial to Chic Classic Cherry


Last November I went to my local Salvation Army with my friend Mel to see if they had anything new or interesting. Of course they always have new and interesting stuff (that gets dropped off daily) and I can usually find some treasure I just can't live without. That day I got especially lucky.
It looked like somebody had dropped off a semi load of furniture because the place was jam packed. There had to be something good with such a vast selection. I always make my way around the big furniture first because I have this inane theory that someone will get to a piece I would want right before me and steal it out from under me. I know it's ridiculous but it could happen.
Here's a sneak peak at the before and after

All the way in the back I saw a dresser that peaked my interest. She was a slightly beat up French provincial dresser with claw feet. Totally late 80's little girl princess room style. I was never lucky enough to have a princess room when I was a little girl and I certainly didn't want one now but I saw potential, a whole lot of elbow grease and a little bit of paint kind of potential. The price tag said $25, not bad. I pulled out one of the drawers and saw that they were dove tailed. The dove tailing and the claw feet totally sold it for me.
I took a picture and sent it along with a text to Cory. I told him I wanted to buy the dresser and paint it. I had no idea what color I was going to paint it much less where I was going to put it, I just knew I wanted it. He gave me the ok and I snatched the ticket off that dresser that I had been guarding and not letting anyone else near for 10 minutes and finally felt comfortable enough to walk away knowing the dresser was mine and I was getting a great deal.

Cory was his usual skeptical self on whether we'd be able to fit the dresser in my Jeep Liberty while I was my usual optimistic self all gung ho on getting it home as soon as possible so I could get started on my new project. The dresser fit perfect (optimism wins again!) with plenty of room for Jackson right next to it and us in the front. That Liberty sure can fit surprisingly large objects and/or amounts of stuff.

I had Cory set the dresser in a big open space in our kitchen between Harley's kennel and the kitchen table. This has now become my pseudo workspace. I can work on projects while watching Jackson and I can listen to/watch tv when Jackson's sleeping. It also encourages me to hurry up and get my project finished so I can get it out of our kitchen.
Cory and I did not have a dresser in our room and it has tons of open space just begging for furniture so that seemed to me the most logical place to put my new purchase. Our bed is cherry along with our bedside tables so to keep with the same wood tone I decided to paint the dresser to look like cherry stained wood.

Yes I said paint to look like stained wood.

Rustoleum makes a wonderful paint product, cabinet transformations, that can make surfaces that aren't wood look like stained wood, glazed or just a plain paint color. Or you can paint wood surfaces too without any messy, time consuming sanding or stripping. I already had tons of experience with cabinet transformations since I painted all my kitchen cabinets with it (post coming up very soon!)

To get the cherry wood look I used the Cabernet color cabinet transformations. I had picked it up on eBay a few months before for $18. Which is a steal of a deal since the kits are usually around $80. The kits include all the supplies you need except paint brushes. I already knew (and liked) how the finished product looked since Mel did her kitchen cabinets with the Cabernet color.

Even though there is no sanding or stripping you still need to prepare your surface for paint. The first step of cabinet transformations is called deglossing. This consists of scrubbing the surface with the deglossing liquid on a scouring pad with some elbow grease, then wiping the surface with a damp rag and lastly wiping the surface with a dry rag. That needs to dry for one hour and you can get started with your first coat of paint. 

When I first used cabinet transformations I scrubbed my heart out. I thought I really needed to scrub hard for the process to work properly. After a while I realized I didn't need to scrub hard enough to get a sweaty workout, just hard enough to where I was satisfied. If you're only satisfied with scrubbing so hard your arms ache, then by all means scrub away.

I used plain white cabinet restorations that I had leftover from my kitchen on my living room woodwork. When I deglossed the woodwork I did a thorough job but not enough to break my back and had no problems with the paint sticking or the wood color leeching through the paint. 

So obviously the next step, painting is pretty self explanatory. I used my favorite shorty Wooster brushes and painted two coats of the reddish brown Cabernet color on the dresser. Cory thought it looked hideous and he let me know how much he didn't like it. But I had faith that it would turn out exactly as I envisioned. Here's a picture of the dresser with two coats of Cabernet.
After you are done painting you can leave the surface you painted as is and put on the last step, the clear coat. Or you can glaze it and then clear coat. The glaze is basically stain. You apply it (I used a foam brush) and then wipe off as much or as little as you want with the provided cheese cloth to get your desired look.

Using the glaze with the Cabernet color to get the dark look I was going for was super easy! I really enjoyed watching the painted surface change to look like stained wood right before my eyes! Here is a picture of the whole process (besides the final clear coat) the two left drawers are painted with one coat of glaze, the two middle are just painted and the last drawer is deglossed.
I put two coats of glaze on before I thought it looked dark enough to match the other furniture in our room. 

Then on to the final step, my favorite, the clear coat. Ah, the home stretch always feels the best. The clear coat goes on the fastest but has the least amount of room for error. You should not rebrush the top coat (I did a couple of times) as it starts to dry really fast so you must be precise and quick. The clear coat dries nice and shiny and pretty hard to protect the surface from dings and scratches.

After all the painting was done I had to put the pulls back on the drawers. I knew I wanted new drawer pulls for the dresser since I didn't want it to resemble the old French provincial style at all anymore so I had filled the holes and sanded them prior to painting. Cory told me too little too late that I had bought bad wood filler. And here I thought I had picked up the best, shows how much I know about wood filler! Thankfully the new antique drawer pulls I bought off eBay for $10 were just a hair off so no one will ever see the bad wood filling job I did...except in the picture of the drawers above of course.

Here's a picture of the finished dresser before we hefted her upstairs to her new room.
And here she is in our room, the proud new holder of Cory's socks and our giant TV that is a must for an insomniac like Cory.
I love how this dresser turned out to look like cherry wood.

I thought ease of the glazing process and the actual painting using the dark cabinet transformations was way easier than using the light cabinet transformations. I do like how the final product looks for both the light and dark kits. Overall I really like cabinet transformations. Everything is included in one kit and you know that all the products will work well together. All of the projects I have done with this product have also exceeded my expectations.

Disclaimer: I am not affiliated with any of the products mentioned. All opinions are my own from my own experiences.

-Sherri


Monday, March 16, 2015

Crock Pot Corned Beef and Brussel Sprouts with Guiness

I had planned on posting my corned beef recipe sooner but this weekend was pretty much a wash for me. I came up with a game plan for Jackson's new big boy room. He's going to be 3 going on 28 at the end of May so I figured he needed a new big bed. That we're going to build. No more crib converted to a toddler bed. That also means new bedding and a new room design.

So I completely wasted almost an entire day loafing around and looking on the net for inspiration and ideas. I'm getting more excited by the minute and I cannot wait to get started! Many posts soon to come on all the projects for his room...

Cory and I actually had a night out this weekend! That's rarer than a pot of gold at the end of a rainbow! So yeah I didn't do much of anything one whole day...it was nice.

Back to what this post is actually about, corned beef and cabbage er I mean brussel sprouts. Why brussel sprouts you ask, well let me tell you about how much I love these little green vegetables and how they are the perfect compliment to corned beef.
I first discovered brussel sprouts a couple summers ago when my bestie Mel and I were gathering food for one of our grilling nights. Neither of us had ever had brussel sprouts (don't be jealous, my mom made me eat more than my fair share of veges) and we're always up for trying something new. So we seasoned those little green guys, threw some butter in and wrapped them in foil. Now I'm forever a brussel sprout lover. If you've never tried them, go do it, you won't regret it, I promise.

Brussel sprouts with corned beef was actually mentioned to me by Mel. I've only cooked corned beef a couple of times, always for St Patrick's Day. The first time I made it, I sautéed cabbage on the stove with some mustard seeds because I didn't want soggy, stinky cabbage. It was pretty good but I wanted to just throw everything in the crockpot and forget about it. Then, thank goodness, Mel told me how she used brussel sprouts, since they're like little cabbages.

Yes, yes they are like little cabbages. Except they are firmer and could withstand hours of cooking without turning into soggy, wet socks. Genius. So now this is how I make my corned beef, in my best cooking buddy, the crockpot (I could go on and on about my love for the crockpot), with brussel sprouts and (of course) Guiness.

Without further ado here is my recipe:

Corned Beef and Brussel Sprouts with Guiness

  • 3-4 lbs corned beef brisket
  • 4 medium potatoes chopped
  • 1medium onion chopped
  • 1 bay leaf 
  • half a can of Guiness
  • 1 garlic clove chopped
  • 1 pound of brussel sprouts

Directions:


1. Place brussel sprouts, potatoes, onions and garlic in crock pot.
2.Trim excess fat from brisket.
3. Put meat on top of veges with bay leaf on top.
4. Pour beer over all.
5.Cover and cook on LOW heat setting 8-10 hours.
6.Let brisket rest for 5-10 minutes and then slice brisket thinly across grain.
7. Serve with vegetables.
I will admit, I did not trim the excess fat from the brisket. I'm lazy, what can I say. I also always cut up onions and freeze them so I almost always have a stash on hand. Again, lazy...or a clever timesaver?
Here's a couple of pictures of me preparing the corned beef brisket.

I always use the packet of spices included in the brisket. Sometimes it's in a packet but this year the brisket was marinating in the spices so I had no choice.

 Here she is, ready for the long haul. Now I can just sit back and relax while dinner cooks...I wish.

8 1/2 hours later, it's time for dinner!

Jackson absolutely loved the corned beef!! Cory couldn't cut it fast enough for him to sneak it off the plate.

There ya have it. Hope it's not too late for you all to try out my corned beef recipe. Well I guess not everyone only makes corned beef on St Patrick's Day. Enjoy!
Happy St Patrick's Day!
xoxo

Sherri


Sunday, March 15, 2015

Green Pepper Clover Stamp Fun For Your Wee Bitty One

I figured my wee bitty one, Jackson, would love to do another painting project, (since he's always up for anything artsy) for St Patrick's Day. I found the perfect fun and easy craft on (you guessed it!) Pinterest.

When I first saw a picture of green peppers used as clover stamps I thought, how crafty and cute! I knew it would be the perfect art project for Jackson! One of my favorite examples out of several that I saw was on i heart naptime.
The process is pretty self explanatory but for the wanna be elementary school art teacher in me (high on the list of my dream jobs!) I'll explain for you all how we did it. Here's the supplies we used:

-Green Paint
-Thick paper
-Several green peppers
-Scissors
-Markers

First we made our favorite super duper easy paint recipe found at one of the best kids artsy sites, Tinkerlab. Here's Jackson helping make the paint. Yes, it's so easy to make a two year old can do it (with a wee bit of help of course).

After we made the paint, I split it up into three shallow bowls wide enough for a green pepper to easily fit in, and used food coloring to make three different color greens.
I then cut three green peppers in half to use as stamps. I had picked out peppers that had the lucky four leaf clover look. You could easily find three leaf clover peppers if you'd prefer that instead.
After preparing the peppers and paint it was up to Jackson to stamp clovers all over the paper. I had to help him a wee bit as the peppers were a bit cumbersome for his tiny two year old hands. He had such a blast and loved stamping and pushing the peppers down on the paper!

The shamrock art looked great all by itself, and for a two year olds artistic ability, totally worthy of front and center fridge, but we decided to spread some luck o' the Irish and give a four leaf clover or two to Jackson's family and friends. We ended up having to do the whole painting project twice, not only because it was loads of fun but because of Jackson's usual terrible two shenanigans he ended up crushing and destroying a few clovers so we didn't have enough to give out to everyone.
So I just pulled the paint out of the fridge and added a splash of water and it worked just as good as the day before. I had also saved the tops of the peppers so he was able to use those the next day. This was such a cheap fun craft, we'll probably try out other fruits and vegetables to use as stamps!

Jackson added all the colors of the rainbow with markers onto the clovers after they were dry and I wrote out how lucky he is to have each person in his life. Hopefully they all receive a wee bit of luck (or at least the little clovers will put a smile on their faces) on St Patty's Day.
When Jackson goes to pass them out he might just give them all a pinch....or a kiss if they're lucky.

Monday, March 9, 2015

St Patrick's Day Shamrock Wreath

One night right before I was going to give Jackson a bath I decided I would try to make another wreath out of wire hangers. I have a few wire hangers left and since they aren't the best for hanging clothes I figured I might as well repurpose them.  I didn't have a St Patrick's Day wreath so I thought I'd try to make a shamrock wreath.

So I grabbed a couple hangers and my pliers and went to work bending and shaping while Jackson splashed around and drew works of art with his bath crayons.

I had a vision but I wasn't too sure how I was going to execute it. I also wasn't sure if I wanted my shamrock to have 3 leaves with a twisted stem or 4 leaves. I originally bent both hangers the same: two heart shaped leaves. I knew they didn't have to be perfect since I was planning on wrapping them, they just needed to be basically the same shape and size.

I left the hangers on the counter in Jackson's bathroom for a week while I marinated on what I wanted to do. St Patrick's Day was coming fast so I knew it was now or never (or probably next year) and I really didn't want those hangers to go to the craft graveyard in my spare room. Pretty much at the eleventh hour it came to me so I got to work.

Saturday, March 7, 2015

St Patrick's Day Ribbon Topiary

Since St. Patrick's Day is right around the corner, I wanted to share with you all some DIY decorations. I was once again inspired by Pinterest for this one, and also once again, my inspiration was abundant. I saw so many adorable ribbon topiaries that I just had to make one of my own!

I love decorating my mantle for all the holidays and I felt it was a tad lacking in St Patrick's day decor so a topiary would be perfect for a tall decoration that I thought was needed to balance everything out.

I googled ribbon topiary and quickly read a great tutorial from Catch my party member just to see if the way I was going to make my topiary was similar to others. Sure enough it was. It's really a very simple process.
Here are the supplies I used:
-Several spools of ribbon (I used different widths and patterns)
-scissors
-push pins
-foam ball
-skewer stick or dowel 
-pot, box, vase or whatever you want to be the base
-foam to push the skewer stick into
-rocks to balance your base
-whatever pretties you want to cover the top of your base
-optional paint for stick

actually bought some if my supplies at *gasp* full price for this one because I couldn't wait for a good deal to fall into my lap. I went to Walmart and saw all the pretty, sparkley ribbon and I was drawn in like a moth to flames. I am SUCH a sucker for sparkley, glittery bejeweled anything. 

So yes, I paid full price for a few spools of ribbon at $1.49 each. But of course I hit up the clearance ribbon and hit the jackpot on green ribbon. Four spools for $1. I also paid a whopping $2.97 for a foam ball and $2 for push pins.
I bought a cute, well it wasn't really cute until I painted it white, pot at Salvo for 59 cents that already had foam in it. It's the perfect size for my mantle. All my other supplies, skewer stick, rocks and paint, I already had.
I gathered my supplies and started by pushing the skewer stick into the foam ball and then pushing that piece into the middle of the foam in the pot. I stuck some rocks into the base to weigh it down since the ribbon ball will be top heavy once completed. I also painted the skewer stick white to match the pot.
I then cut out five 3 1/2" to 4" strips of each of my different ribbons. I vastly underestimated and ended up needing about 15-20 strips of each ribbon by the time I was finished. Jackson hung out with me at the table and played with his "sand" pretty much the whole time. It was nice and relaxing...for a change.
Placing/pinning the ribbons on the topiary is extremely easy. First I wrapped the ribbon into a circle, slightly overlapping the ends.

I had two different sized ribbons so for the larger ribbons I used two pins on either end of the overlapping part of the wrapped ribbon. For the smaller ribbons I only used one pin in the middle of the overlapping part of the wrapped ribbon. When the topiary was fairly full I started using one pin for the larger ribbons since it was easier to squeeze them in that way.
I made sure to stagger the ribbons and alternate directions so the same kinds would not end up next to each other. If you don't like where you put one, you can just pull it out and put it in another place that looks more pleasing.
I jammed packed my topiary because I really like the full look. I ended up having to put more rocks in the base to hold my skewer stick up and squeezing some glue around the rocks and the stick. I put a little bit of moss on top of the rocks for some green color. I didn't glue the foam ball to the skewer stick so that if I happen to want to make a ribbon topiary for another holiday I can use the same pot that works so great for my mantle.
The topiary really balances out my St Patrick's Day mantle. It almost looks like a cute little tree at first glance.
All in all I spent around $11, which isn't my thriftiest crafty project but I guess they can't all cost $2.

Blogger template designed By Sherri.